


System Setup - tuning an open loop system
24/01/09
It's been longer than I planned and several people have asked me how to tune/adjust their system, so here's part one. Note: Whilst the theory also applies to mixer systems with feedback controllers (to be covered in a later article), the adjustment is only for open loop systems. Injection systems are different again, but as I haven't had the opportunity to deal with any yet, they will have to wait —sorry.
Now how I am going to present this is different to most instructions you'll find. Usually you will find instructions that say "twiddle this, turn that, set the other", you will find those at the end, but first I intend to explain what it is that you will be adjusting and why — hopefully it will then make sense and you'll understand what each adjustment is doing.
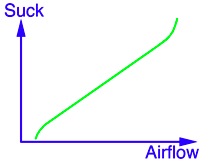 Firstly, lets look at what the mixer is doing for us. I've briefly mentioned it in passing before, but the mixer is responsible for sucking the gas from the reducer — the reducer does NOT push it (except perhaps at idle as noted below). The graph is a generalised representation of how “suck” (for want of a better term) varies with airflow, and you can see that it is fairly linear over a wide range of flows.
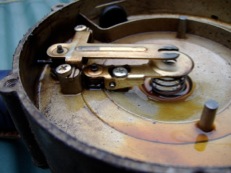
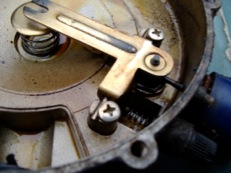 Now lets look at the insides of the reducer. If we idealise it, it simply supplies as much gas as we suck at very little pressure. The internals here are of a Romano “Super” which has the second lever and valve you can see underneath the longer main lever - this passes more gas under high demand to support larger engines. The diaphragm is connected to the fork in the end of the long lever, and under the other end of the lever is a pad that closes off the end of the gas orifice. Down in the well is a spring that pushes it closed – this allows us to adjust the pressure bias as described below. On this unit, screwing the bias adjustment in (clockwise) increases the pressure on the spring, and so reduces the pressure/flow.
You can also see the smaller idle bleed screw, this simply has a tapered end that controls the size of a small orifice in the side of the main gas jet.
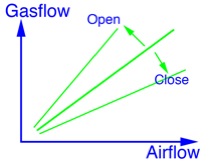 The first, and usually most obvious adjustment is the power valve. It restricts the flow of gas and so varies the amount of gas supplied for a given amount of “suck”. The effect is to change the slope of our flow-suck graph like this. Note that I've now labelled the graph with gas flow rather than suck and I've ignored the non linearities at high and low flow rates. So adjusting the power valve will alter the mixture by a similar amount at all flow rates.
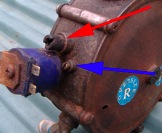
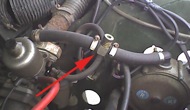
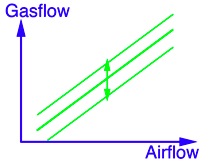 The next adjustment people tend to notice is the larger control on the reducer - the bias setting (red arrow). Our idealised reducer gives us gas vapour at zero pressure, but this is adjustable. We can turn it one way and supply gas at a positive pressure, or turn it the other and require a small vacuum to pull gas out. The effect is to move the gas flow line up or down on the graph like this.
Lastly there is the idle bypass screw (blue arrow), this simply allows a small constant flow of gas separately from that through the main metering valve. The effect is to add gas (richen the mixture) at idle but has very little effect otherwise. Remember that before I conveniently ignored it, there is a drop-off in suck from the mixer at very low air flow rates, the idle bleed forces some gas through to mitigate this — otherwise we could have an excessively weak mixture at idle.
What tools do you need ?
 Ideally you want an exhaust gas analyser that can tell you exactly what is going on. Since not many people have that, and it's not very portable for a road test, then a “poor man's substitute” can be a lambda probe in the tail pipe — I made a simple adapter from a piece of pipe that simply clamps in place. You need to provide a heater supply as the exhaust is far too cold and won't heat the probe up on it's own, and you can either use a voltmeter or buy a purpose designed display to see what the probe output is doing. The probe output is “low” for weak, or “high” for rich, and the transition is quite abrupt so you will rarely see “in between”. With a standard probe there is a certain amount of information as to how rich or weak the mixture is, but not a lot. For example, with an “only just” weak mixture you may see 0.1V, but with “quite weak” you may see 0.05V or less. Similarly, you may see 0.9V for “just rich” and 0.95V or more for “quite rich”. Don't rely on this as anything more than an indication — it's very non-linear and varies with a number of factors including probe temperature. There are wideband probes designed to show the actual mixture, but they aren't necessary for this.
Right, so that's the theory, I'm sure you're keen to get on, so lets get under the bonnet and start twiddling !
The first thing to do is ask yourself — has this system already been setup ? If so then skip down a few steps (to fine-tuning) as the first steps here are to get a “system that runs”.
Get the car started and warmed up, and switch to gas. Hopefully you'll get it to run, even if badly. First we need to get the reducer bias set :
Set the power valve to about half way and screw the idle bleed screw fully in then out half a turn on the reducer.
Adjust the bias adjustment on the reducer so the engine runs smoothly at idle (or at least at a moderately fast idle) and then turn it towards lean until the engine slows a little. If using an analyser or lambda probe, simply adjust so that the mixture is a little on the weak side.
Now we set the power valve :
Increase engine speed to about 2000rpm
Adjust the power valve to give max engine revs, or to give an “about right” mixture if using an analyser or probe.
You may need to re-adjust the throttle as the revs could go up quite a lot if the power valve was a long way from optimum. If you did adjust the power valve a lot, go back and repeat the bias adjustment as adjusting the power valve will have affect idle mixture as well.
You should now have a system that will run the engine and drive, but it won't be optimum.
Now for fine tuning.
Hook up your lambda probe and go for a drive — ideally with an assistant so one of you can concentrate on the road ! You want a road where you won't bother other users, and can easily vary engine load from low to high.
Now gently vary engine load from low to high and watch the mixture. Is it rich or weak ? Does it change across the power band ? Now look at the graphs above and see which adjustment you need to tweak, make a small adjustment and repeat. At first you are likely to make large adjustments and find you go from one extreme to another - just keep calm, try smaller adjustments. Just 12th of a turn, half a flat on a hexagon, adjustment on the power valve can go from quite weak to quite rich.
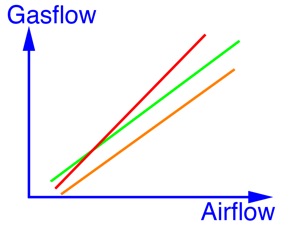 As an example, suppose you find you are lean at low power but quite rich at medium and high power – the red line here. By closing the power valve a little we can rotate the red line to the orange line, and then by adjusting the bias we can move to the green line. In practice you’ll find that the lines aren’t straight and you will not get it spot on – but with a bit of patience you should be able to get quite a reasonable mixture.
Occasionally check the mixture at idle and adjust the idle bleed screw – it will have a slight effect across the power band. I prefer to have the mixture lean at idle. If the revs drop the mixture tends to richen — if it's rich to start with then it gets richer, revs drop more, and the process can result in the engine dying with a rich mixture. If the mixture is normally a little lean, it richens and this tends to counteract the drop in revs. Don't worry if you end up with the idle bleed screw fully in, I've set up several systems that have ended like that.
With a little patience you should end up with a vehicle that is both economical and runs nicely across all power settings — but you'll realise why I prefer automatic feedback systems !
Note that as the air filters age, the mixture will richen slightly, and when you fit new ones, it will weaken again.
Now how I am going to present this is different to most instructions you'll find. Usually you will find instructions that say "twiddle this, turn that, set the other", you will find those at the end, but first I intend to explain what it is that you will be adjusting and why — hopefully it will then make sense and you'll understand what each adjustment is doing.
You can also see the smaller idle bleed screw, this simply has a tapered end that controls the size of a small orifice in the side of the main gas jet.
Lastly there is the idle bypass screw (blue arrow), this simply allows a small constant flow of gas separately from that through the main metering valve. The effect is to add gas (richen the mixture) at idle but has very little effect otherwise. Remember that before I conveniently ignored it, there is a drop-off in suck from the mixer at very low air flow rates, the idle bleed forces some gas through to mitigate this — otherwise we could have an excessively weak mixture at idle.
What tools do you need ?
Right, so that's the theory, I'm sure you're keen to get on, so lets get under the bonnet and start twiddling !
The first thing to do is ask yourself — has this system already been setup ? If so then skip down a few steps (to fine-tuning) as the first steps here are to get a “system that runs”.
Get the car started and warmed up, and switch to gas. Hopefully you'll get it to run, even if badly. First we need to get the reducer bias set :
Set the power valve to about half way and screw the idle bleed screw fully in then out half a turn on the reducer.
Adjust the bias adjustment on the reducer so the engine runs smoothly at idle (or at least at a moderately fast idle) and then turn it towards lean until the engine slows a little. If using an analyser or lambda probe, simply adjust so that the mixture is a little on the weak side.
Now we set the power valve :
Increase engine speed to about 2000rpm
Adjust the power valve to give max engine revs, or to give an “about right” mixture if using an analyser or probe.
You may need to re-adjust the throttle as the revs could go up quite a lot if the power valve was a long way from optimum. If you did adjust the power valve a lot, go back and repeat the bias adjustment as adjusting the power valve will have affect idle mixture as well.
You should now have a system that will run the engine and drive, but it won't be optimum.
Now for fine tuning.
Hook up your lambda probe and go for a drive — ideally with an assistant so one of you can concentrate on the road ! You want a road where you won't bother other users, and can easily vary engine load from low to high.
Now gently vary engine load from low to high and watch the mixture. Is it rich or weak ? Does it change across the power band ? Now look at the graphs above and see which adjustment you need to tweak, make a small adjustment and repeat. At first you are likely to make large adjustments and find you go from one extreme to another - just keep calm, try smaller adjustments. Just 12th of a turn, half a flat on a hexagon, adjustment on the power valve can go from quite weak to quite rich.
As an example, suppose you find you are lean at low power but quite rich at medium and high power – the red line here. By closing the power valve a little we can rotate the red line to the orange line, and then by adjusting the bias we can move to the green line. In practice you’ll find that the lines aren’t straight and you will not get it spot on – but with a bit of patience you should be able to get quite a reasonable mixture.Occasionally check the mixture at idle and adjust the idle bleed screw – it will have a slight effect across the power band. I prefer to have the mixture lean at idle. If the revs drop the mixture tends to richen — if it's rich to start with then it gets richer, revs drop more, and the process can result in the engine dying with a rich mixture. If the mixture is normally a little lean, it richens and this tends to counteract the drop in revs. Don't worry if you end up with the idle bleed screw fully in, I've set up several systems that have ended like that.
With a little patience you should end up with a vehicle that is both economical and runs nicely across all power settings — but you'll realise why I prefer automatic feedback systems !
Note that as the air filters age, the mixture will richen slightly, and when you fit new ones, it will weaken again.